

Monitor Arm Positioning: Measurement First, VESA and Tension Checks
Set the top edge of your screen at or just below eye level, keep the centre about 15 to 20 degrees below your horizontal line of sight, and tilt the panel back 10 to 20 degrees. Place it roughly an arm’s length away. If you’re running two or more screens, match every top edge and angle them into a shallow arc so your eyes stay level and only your head turns.
TL;DR:
- Proper monitor height placement is at or just below eye level with the top edge tilted back 10 to 20 degrees to reduce glare and maintain neck neutrality.
- Match top edges and center distances when setting up multiple monitors, ensuring they are within 10 centimeters in height and 10 centimeters in depth to prevent neck and eye fatigue.
- Use appropriate mount types—clamp, grommet, or wall—based on desk materials and permanence, positioning clamps roughly 25 to 50 millimeters from the rear edge for optimal leverage.
- Adjust tension settings on monitor arms to match the monitor’s weight, verifying VESA screw depth and compatibility to prevent drifting or wobbling over time.
- Regularly recheck calibration after task shifts and seasonal changes, re-tensioning or repositioning to sustain ergonomic alignment and contact comfort.
Table of Contents
- What’s the correct setup process for monitor arm positioning?
- How do I position a single monitor on an arm?
- How do I align two or three monitors on arms?
- Clamp, grommet, or wall: which mount suits your desk?
- How do I set tension and fit VESA screws safely?
- Why does my monitor arm keep drifting or wobbling?
- When should you re-check your monitor arm positioning?
- How should cables be managed around a monitor arm?
- How does a sit-stand desk change monitor arm positioning?
- ALXR’s perspective on when to bring in a professional fit
- Get your monitor arm setup fitted right the first time
- Where to check the official ergonomic guidance
- Sources
- FAQ
What’s the correct setup process for monitor arm positioning?
Getting these numbers right in one sitting beats fiddling for weeks. Work through this order and you’ll land on a safe baseline in about ten minutes.
- Check your desk first. Measure the edge thickness and material before you buy or fit an arm, since clamp, grommet, and wall mounts each demand something different from the surface underneath.
- Mount the arm and route cables early. Thread cables through the arm’s channels before you attach the monitor. Doing it afterwards means unscrewing everything you just tightened.
- Set distance before height. Push the arm out to roughly an arm’s length, then bring the top edge down until it sits at or just below eye level.
- Tilt and centre. Angle the screen back 10 to 20 degrees and slide it until the panel lines up with your nose, not your shoulder.
- Tension and test. Tighten the gas spring so the screen holds still under its own weight but glides with light finger pressure, then check the VESA screws are seated to the correct depth.
Pro Tip: Do the height and distance adjustments while sitting in your actual working posture, not standing over the desk. What looks right from standing is almost always too low once you sit down.
How do I position a single monitor on an arm?
Posture comes before pixels. Start with your chair and desk height so your forearms rest horizontal and your feet sit flat on the floor, because every monitor measurement that follows depends on that baseline being correct.
From there, work through distance, height, tilt, and text size in sequence:
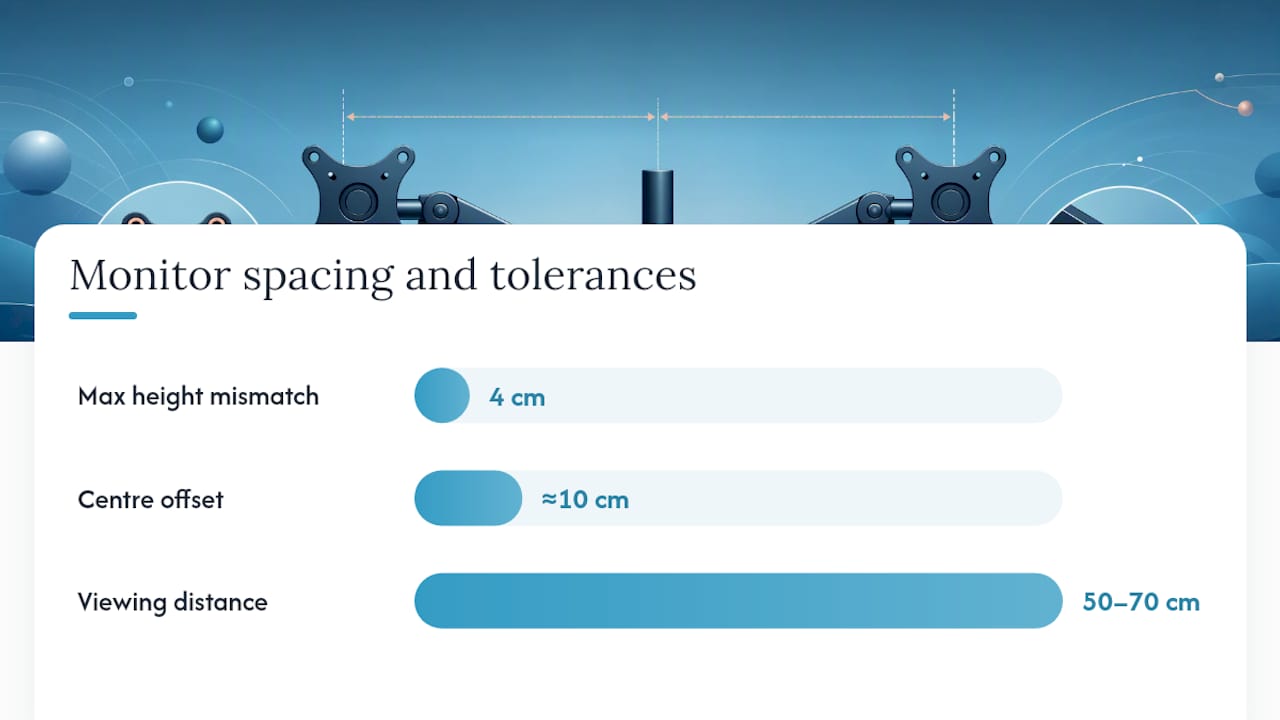
- Distance: Extend the arm until the screen sits roughly an arm’s length away, typically 50 to 70 centimetres for a 24 to 27-inch panel, pushed further out for anything larger.
- Tilt: Angle the panel backward by 10 to 20 degrees. This single adjustment does double duty, cutting glare from overhead lighting and keeping your neck from craning forward to compensate.
- Text and scaling: Check your font size and display scaling once the physical position is set. If you find yourself leaning in to read small text, increase scaling rather than dragging the arm closer, which undoes the distance work you just did.
A desk that sits at the wrong height undermines all four adjustments at once, which is why height-adjustable desks and sit-stand frames matter more than people expect when they’re troubleshooting neck strain that a monitor arm alone can’t fix.
How do I align two or three monitors on arms?
Multi monitor positioning lives or dies on matching geometry, not on buying identical screens. Pick one panel as your primary display and centre it directly on your body’s midline, since this is the screen you’ll spend most of your day looking at square on.
From there:
- Match every top edge. A height mismatch of even four centimetres between screens causes real neck fatigue by the end of the day, so measure rather than eyeball it.
- Keep centres within about 10 centimetres of each other’s distance. Uneven depth forces constant refocusing, which tires your eyes faster than the angle itself.
- Toe the inner edges in by 10 to 20 degrees. Dual monitor geometry guides recommend this shallow arc specifically so your eyes travel between screens while your head stays largely still.
- Adjust distance by panel size. The 50 to 70 centimetre rule holds for 24 to 27 inch screens; push larger panels back further so you’re not scanning edge to edge.
- Drop portrait-oriented screens lower. Rotating a monitor 90 degrees adds height, so lower the mount to stop the top edge climbing above eye level.
Pro Tip: If you use a third, secondary monitor purely for reference material, it’s fine to angle it further out and tilt it slightly more than your primary pair. It doesn’t need the same ergonomic precision as the screen you type into all day.
A twin spring assisted monitor arm makes this arc easier to hold in place than two separate single arms, since both screens pivot from a shared, calibrated base.
Clamp, grommet, or wall: which mount suits your desk?
The mount you choose decides how much of this positioning work you can actually do. Each option trades flexibility against permanence.
Clamp mounts grip the desk edge and can be repositioned or removed without leaving a mark, which suits shared desks or rented offices. They need a suitable edge thickness, though, and a desktop that’s too thin or too thick will stop the clamp seating properly.
Grommet mounts pass through a drilled hole in the desk and anchor rock solid, which is why they’re common in fixed workstations that won’t move for years. Committing to one means committing to the hole.
Wall mounts free up the entire desk surface and suit minimal setups, but they require fixing into a stud and planning the arm’s reach before installation, not after.
Whichever you choose, clamp placement matters as much as the mount type. Position the clamp 25 to 50 millimetres from the rear desk edge for the best leverage and full extension range. Leave roughly 200 millimetres of clearance behind the desk too, so the arm doesn’t strike the wall when fully extended, a detail that manufacturer setup guides flag as one of the most common installation oversights.
- Confirm desk thickness before ordering a clamp mount.
- Check for wall studs before committing to a wall mount location.
- Measure available depth behind the desk, not just width across it.
How do I set tension and fit VESA screws safely?
Tension and hardware compatibility are where most home installations go wrong, usually silently, until a screen starts drooping months later. Start by confirming your monitor’s actual weight against the arm’s rated capacity, choosing an arm with a comfortable margin above what you’re mounting rather than one that’s rated right at the edge.
- Set gas spring tension so the screen holds its position under its own weight but still moves with light hand pressure. Most arms have a tension screw or dial on the joint nearest the mount; turn it in small increments and retest after each adjustment.
- Verify the VESA pattern on the back of your monitor (commonly 75×75mm or 100×100mm) matches the arm’s mounting plate before you tighten anything.
- Match screw length to your monitor’s panel depth. A screw that’s too long risks puncturing internal components behind the VESA plate; one that’s too short won’t engage enough thread to hold securely.
- Re-service worn arms. If a screen keeps drifting downward after you’ve maxed out the tension adjustment, the gas spring itself may be worn and needs replacing rather than endlessly retightened.
Pro Tip: Always check the screw depth against your specific monitor model before final tightening, even if the arm ships with “universal” hardware. Manufacturer guidance on VESA screw length exists precisely because this varies more between models than most people assume.
A twin pole mounted monitor arm is worth considering if you’re mounting heavier ultrawide panels, since the pole base distributes weight differently to a standard clamp arm and tends to hold tension longer under load.
Why does my monitor arm keep drifting or wobbling?
Most positioning complaints trace back to five recurring faults, and each has a quick fix.
- Screen drifts upward or downward on its own: increase gas spring tension, or check whether the monitor’s actual weight exceeds the arm’s comfortable range.
- Whole arm wobbles at the base: retighten the clamp or grommet fixing, and move the clamp closer to the desk edge for better leverage; hollow or laminated desktops sometimes need a reinforcing plate underneath.
- Two screens sit at mismatched heights: use VESA plate offsets or re-measure both top edges rather than trusting the arm’s default resting position.
- Persistent glare despite tilting: reposition the whole setup relative to windows, or add diffuse ambient lighting rather than tilting the screen further than the recommended 20 degrees.
- Screw-related damage or looseness: inspect screw length before final tightening every time you remount a different monitor, since swapping panels often means swapping screw depth too.
When should you re-check your monitor arm positioning?
Your ideal position isn’t fixed. It shifts with what you’re actually doing at the desk, and treating one setup as permanent is where most posture problems creep back in.
Typing-heavy work rewards a slightly closer, more upright screen, since your eyes stay locked on one point for long stretches. Reading dense documents or spreadsheets often works better with the screen pulled back a touch further, giving your eyes room to scan without the text filling your entire field of view. Video calls change things again: many people unconsciously lean toward the camera, which pulls their head forward and undoes the neutral neck position they set up that morning.
Build in a quick check every few hours, particularly after switching tasks. It takes seconds: shoulders back, screen top still at or below eye level, no forward lean. If you catch yourself hunching toward the screen repeatedly during calls, the fix usually isn’t willpower, it’s moving the screen slightly closer so leaning in stops feeling necessary.
Seasonal changes matter too. Daylight shifts through the year change glare angles from windows, so a tilt that worked in winter might need a small tweak by summer. Anyone using a laptop alongside an external monitor should also reassess whenever they add a second screen, since the primary/secondary hierarchy changes which one deserves the prime eye-level position.
How should cables be managed around a monitor arm?
Cable strain undoes good positioning faster than almost anything else, because a taut cable physically pulls the screen out of alignment every time the arm moves. Route cables through the arm’s built-in channels, where they exist, before you make your final height and tilt adjustments, not after.
Leave enough slack at every pivot point for the arm’s full range of motion. Test this deliberately: extend the arm to its furthest reach and drop it to its lowest point, watching whether any cable pulls taut or drags the monitor slightly out of position. If it does, you’ve found a slack shortfall that will nag at your alignment every time you adjust the arm going forward.
Loose cables hanging below the desk create their own hazard, catching on chairs or feet, so bundle the run from arm to desktop with a sleeve or clip rather than leaving it loose. Keep power and video cables separate where possible; bundling them together can occasionally introduce interference on longer runs, particularly with older HDMI or DisplayPort cables.
If you’re mounting a monitor with a built-in USB hub or webcam, route those cables last, since they’re the ones you’ll unplug most often for peripherals, and burying them under video and power cables makes routine unplugging needlessly awkward.
How does a sit-stand desk change monitor arm positioning?
Sit-stand desks add a variable that fixed desks don’t have: the same arm now needs to work correctly at two very different heights. The core measurements don’t change between sitting and standing, top edge at eye level, centre 15 to 20 degrees below horizontal, but your eye level itself shifts by 20 to 30 centimetres or more when you stand up.
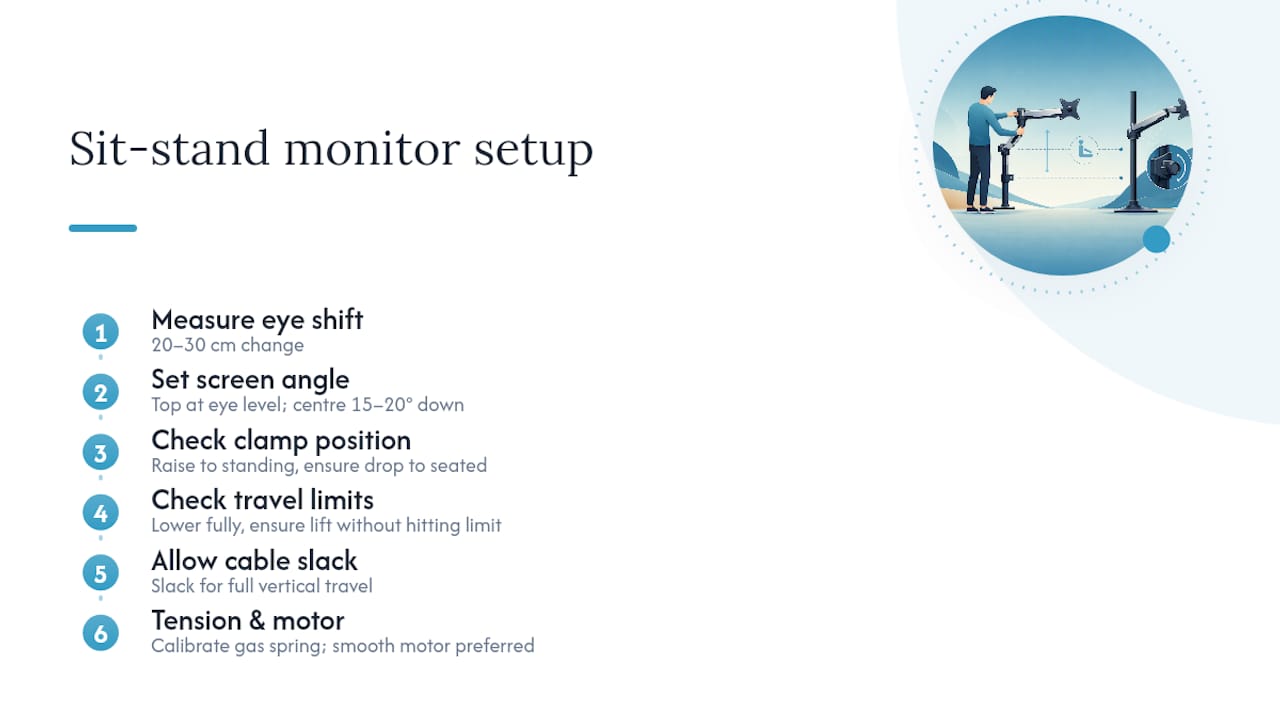
The arm has to track that shift, not just tolerate it. A clamp mounted too high on the desk’s vertical travel range can run out of downward adjustment once you’re seated, leaving the screen sitting too high for comfortable sitting posture. Test the full range before finalising clamp position: raise the desk to its tallest standing height and check the arm can still drop the screen to seated eye level, then lower the desk fully and check the arm has room to lift the screen back up without hitting its mechanical limit.
Gas spring tension calibrated for a screen’s static weight generally holds across both heights, but cable slack needs generous allowance for the full vertical travel, not just the range you use daily. An electric sit-stand desk with a smooth, consistent motor makes this easier to get right once, since a jerky or uneven lift mechanism can shake a poorly tensioned arm out of alignment over repeated cycles.
ALXR’s perspective on when to bring in a professional fit
Most single-monitor setups are entirely manageable without help. Where a professional installer earns their place is with heavier or numerous monitors, wall mounting into studs, complex cable runs across shared desking, or institutional procurement where dozens of workstations need consistent positioning across a floor.
That’s the gap Alxr’s nationwide delivery and installation service is built for. As an NHS-approved supplier working across commercial, healthcare, and education environments, Alxr fits arms with the tension and VESA checks this article covers, at a scale that’s impractical to manage desk by desk. For a single home office, a careful DIY fit with the right hardware is entirely sufficient. For a floor of workstations, getting it wrong ten times over costs more than getting it right once.
— Syed
Get your monitor arm setup fitted right the first time
Getting the geometry right on paper is one thing; fitting it correctly across a busy office is another. Professional delivery and installation services mean you won’t need to tension gas springs or double-check VESA screw depth across many desks. High standards of fit-out are important in environments where getting it wrong isn’t an option.
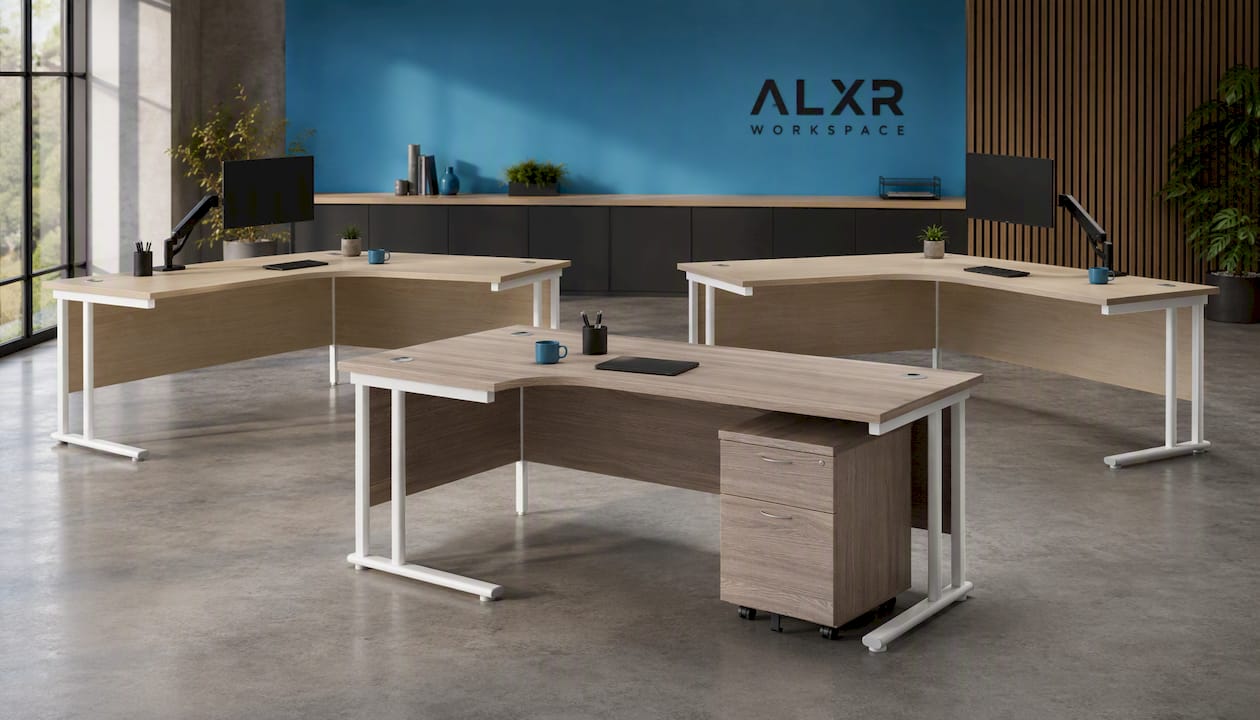
If you’re planning a multi-monitor workstation, the Twin Upright Left Hand Radial Desk and its right-hand configuration both give you the radial surface area that dual and triple arm setups need to breathe. Busier workstations that also need drawer storage close at hand suit the Twin Upright Left Hand Radial Desk with Mobile 2 Drawer Pedestal. Anyone weighing up desk height alongside arm positioning, especially across a shared office, should also look at how flexible workspace providers like Centro House Marbella approach shared desking layouts, or how Cloud OS frames workstation planning for small teams.
Request a site survey or space planning consultation through Alxr’s workspace site and get your desks, arms, and installation sorted in one visit.
Where to check the official ergonomic guidance
For the formal standards behind the numbers in this article, the Health and Safety Executive’s guidance on display screen ergonomics covers viewing angle and tilt in detail, while the Canadian Centre for Occupational Health and Safety’s monitor positioning advice sets out viewing distance and screen alignment. For hands-on installation detail beyond what’s covered here, DeskGearReviews’ dual monitor setup tutorial and the dual monitor geometry guide both walk through practical arc angles and hardware checks step by step.
Sources
- Canadian Centre for Occupational Health and Safety — monitor positioning advice
- DeskGearReviews — dual monitor setup and installation tips
- Dual monitor setup guide — geometry recommendations and practical steps
FAQ
Where should I position my monitor arm?
Position the screen so its top edge sits at or just below eye level, with the centre roughly 15 to 20 degrees below your horizontal line of sight, tilted back 10 to 20 degrees. Set the distance at roughly an arm’s length, around 50 to 70 centimetres for a 24 to 27 inch screen.
How do I perfectly align three monitors?
Centre your primary screen on your midline, then match every top edge across all three panels so none sits higher or lower than the others. Angle the two outer screens inward by 10 to 20 degrees to form a shallow arc, keeping all three centres within about 10 centimetres of the same viewing distance.
Should I angle my monitor up or down?
Tilt it back, not up, by 10 to 20 degrees. This reduces glare from overhead lighting and keeps your neck in a neutral position, whereas an upward tilt forces you to look down uncomfortably at a screen that’s already positioned too low.
My monitor arm keeps drifting upward. How can I fix this?
Increase the gas spring tension using the adjustment screw on the arm’s main joint, turning it gradually and retesting movement after each turn. If the arm still drifts once tension is maxed out, the monitor likely exceeds the arm’s comfortable weight capacity, or the spring itself is worn and needs replacing.
Do I need a professional to install a monitor arm?
Most single-screen setups are straightforward enough to fit yourself with basic tools and the checks covered above. Heavier or multiple monitors, wall mounting, and larger office fit-outs benefit from Alxr’s nationwide delivery and installation service, particularly where consistent positioning across many desks matters.